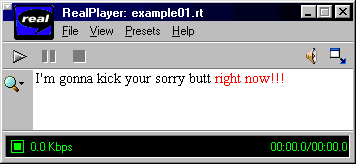
Fig. 01 - It's as simple as that.
This tutorial will try to give you the basics of RealText creation, with emphasis on "closed captioning", which can be used to create subtitles without changing the RealVideo file.
I want to thank JD for hosting this page some time ago in his site, and to be as motivated as I am with this subject. Also, his site for animes was great. I hope that he find the time to make it come back to life...
Please, send your comments, suggestions, complaints and questions to Ricardo M. Ferreira at ric@mpcnet.com.br.
The RealText mark-up language is a new feature of the RealPlayer G2 that allows text streaming, in a similar way that RealVideo is a video streaming. With SMIL (another new feature), you can create presentations that combine together streams of audio, video and text.
You can set the text attributes (like typeface, size, color, ...), time when it appears and disappears, and position (including over or outside the video window area).
The RealText language is simple and intuitive, so it's really very easy to learn. You don't need previous experience with any other computer/scripting language, but if you have some knowledge of HTML it will be even easier for you to get started.
To follow this tutorial and create RealText files, all you'll need is:
The syntax of the RealText mark-up language is very similar to HTML. If you can write HTML, you already know the basics about RealText.
A RealText file is made of
An example of a single line inside of a RealText file is:
I'm gonna kick your sorry butt <font color="red">right now!!!</font>

Notice that the text inside the "<" and ">" symbols are not displayed, but rather interpreted by the player, who see it as a command to change the color of the text font.
Now that you know a bit about how it works, here are some rules that you need to be aware of:
The wrong-and-right table:
| Wrong | Right |
|---|---|
| "Kodomo no omocha - 01.rt" | "Kodomo_no_omocha-01.rt" |
| <FONT COLOR=WHITE> | <font color="white"> |
| <br> | <br/> |
Here is another simple sample:
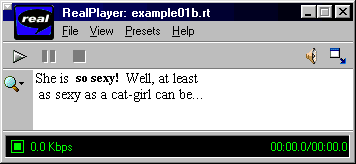
She is <b> so sexy! </b> Well, at least <br/> as sexy as a cat-girl can be...

All your RealText files must have this pair of tags:
<window>
</window>
They are the first and the last line in your file, respectively. Everything else goes between these tags.
Here's a fully working example of a RealText file. Copy and paste it into your editor and save it as "example01.rt" (if you're using Wordpad, remember to always save as a "Text Document" type).
<window width="320" height="60">
I'm gonna kick your sorry butt <font color="red">right now!!!</font>
</window>
When you play this file, you'll have the result seen in fig. 01. The width and height values are the horizontal and vertical size of the window in pixels, respectively.
Play with the values and see what happens. Change the file to get the same result found in fig. 02.
Let's jump out of the basics this time. Save the text below to "example02.rt" and see how it plays.
<window width="320" height="140">
Countdown starts in five seconds...<br/>
<time begin="3"/>Get ready!<br/>
<time begin="5"/>Five...<br/>
<time begin="6"/>... four... <br/>
<time begin="7"/>... three...<br/>
<time begin="8"/>... two... <br/>
<time begin="9"/>... one...<br/>
<time begin="10"/>Launching the Battle Squadron!
</window>

Of course, you will see it animated. :-)
As you can see, the <time> tag determines when a text will appear in the RealText window. The unit of the value is a second, and all time information are related to the beginning of the presentation.
You can type the value in seconds or in the format "dd:hh:mm:ss.xyz". So, if you want a text to appear 60 seconds after the start of the file, you can type any of the three lines below:
<time begin="60">60 seconds have been passed...
<time begin="1:00">60 seconds have been passed...
<time begin="00:01:00.0">60 seconds have been passed...
Our next section is all about tags.
The attributes of your window and the text where it appears are both controlled by tags. With the appropriated value, your text can scroll from right to left, from bottom to top or do some other amazing things! :-) But here we will only look at those relevants to our intent.
Here's a piece of a real RealText file for you to use as reference:
<window type="generic"
 duration="13:20.9"
 height="30"
 width="320"
 bgcolor="#808080"
 wordwrap="true" />

<font color="black" face="arial" size="2">
<center>

<time begin="00:00.0"/><clear/>Tradução e legenda em português: 08/1999<br/>
Ricardo M. Ferreira - ric@bestway.com.br
<time begin="00:04.0"/><clear/>

<!-- the opening subtitles -->
<time begin="00:13.7"/><clear/>Kodomo no Omocha<br/>(Brinquedo de Criança)
<time begin="00:16.7"/><clear/><font color="#008040"><b>O boato sobre eu te amar é verdade, é sim.
<time begin="00:22.6"/><clear/>
<time begin="00:23.8"/><clear/>Você não consegue ignorar também.
<time begin="00:26.1"/><clear/>

</b>
</center>
</font>
</window>
<window> ... </window>
All values are rather self-explanatory:
<font> ... </font>
<center> ... </center>
<clear/>
<br/>
<b> ... </b>
<i> ... </i>
<u> ... </u>
<!-- ... -->
Color names and codes
| white (#FFFFFF) | silver (#C0C0C0) | gray (#808080) | black (#000000) |
| yellow (#FFFF00) | fuchsia (#FF00FF) | red (#FF0000) | maroon (#800000) |
| lime (#00FF00) | olive (#808000) | green (#008000) | purple (#800080) |
| aqua (#00FFFF) | teal (#008080) | blue (#0000FF) | navy (#000080) |
To show the "<", ">" and
"&" characters in your subtitle, you must use a
"character entity".
| Glyph | Syntax | Description |
|---|---|---|
| < | < | "Less than" sign |
| > | > | "Greater than" sign |
| & | & | Ampersand |
| (non breaking space) | | Non breaking space |
For example, the following line
Calling <Mr. Shinji & Mrs. Rei>
... will look like this in the RealText window:
Calling <Mr. Shinji & Mrs. Rei>
So far we have covered only the RealText itself. But how do we put it together with the video?
To accomplish this, we must create a SMIL file that contains information about your presentation, as the name of the files it will play, and their window's position and size on screen.
All basic rules for a RealText files apply to a SMIL file (except that the extension must be ".smi" or ".smil"). Here's a complete example:
<smil>

   <head>
      <meta name="title" content="Ep. 01 - Kodomo no Omocha (Brinquedo de Criança)" />
      <meta name="author" content="Ricardo M. Ferreira - ric@bestway.com.br" />
      <meta name="copyright" content="(c) 1999" />
      <layout>
         <root-layout width="320" height="270" />
         <region id="video_region" width="320" height="240" left="0" top="0" />
         <region id="text_region" width="320" height="30" left="0" top="240" />
      </layout>
   </head>

   <body>
      <par>
         <textstream src="kodomo_ep1part1.rt" region="text_region" fill="freeze" />
         <video src="kodomo_ep1part1.rm" region="video_region" fill="freeze" />
      </par>
   </body>

</smil>
Let's look at the meaning of each tag:
<smil> ... </smil>
<head> ... </head>
<meta name/>
<layout> ... </layout>
<root-layout/>
<region id/>
Remember to always use here, for the RealText region, the same <width> and <height> values you set in the <window> tag of the .rt file.
<body> .. </body>
<par> .. </par>
<textstream/> <video/>
The fill="freeze" value will keep the last frame visible when the presentation ends.
Now that you have your RealVideo (.rm), RealText (.rt) and SMIL (.smi) files, you can play the SMIL file to start your presentation.
<video src="file://e:/animes/kodomo_ep1part1.rm" region="video_region" fill="freeze" />
If you know a way to find this information out using the RealPlayer, or even another software, please tell me and I'll write your tip in this section. :-)
I found out that <font face="arial" size="2"> have a height of 15 pixels per line. As I use only two lines for most of the movies, my window region is set with a height of 30 pixels.
A much longer and more comprehensive description of the RealText format (the "RealText Authoring Guide") can be found at http://service.real.com/help/library/guides/realtext/realtext.htm or http://service.real.com/help/library/encoders.html (search for RealText and choose to read it on-line or download).